C sharp与PLC变量在数据交互上的一些探索
1. 基于C#的数据交互
A. S7,using S7.Net,后文读写数据时二次封装过S7协议,这里暂且不表,只列举S7协议最原始的应用。
new一个PLC对象
1
2
3
4
5
6
7
//idenfy basic link params
private string plc_ip;
private CpuType plc_type;
private short plc_rack, plc_slot;
public Plc my_plc;
my_plc = new Plc(plc_type, plc_ip, plc_rack, plc_slot);连接和断开PLC
1
2
3
4
5
6
7
8
9
10
11
12
13
14
15
16
17
18
19
20
21
22
23
24
25
26
27
28
29
30
31
32
33
34
//connect
public bool connect_plc()
{
try
{
my_plc.Open();
}
catch
{
MessageBox.Show("plc can't be connected,check params!");
}
if (my_plc.IsConnected)
{
return true;
}
else
{
return false;
}
}
//disconnected
public bool disconnect_plc()
{
my_plc.Close();
if (my_plc.IsConnected)
{
return false;
}
else
{
return true;
}
}读写数据,S7_registertype是PLC的寄存器地址类型,如DB,M,I,Q,T,C等。S7_datatype是自己提前封装好的bool,byte,word,int等等这一类基础数据类型
1
2
3
4
5
6//写bool,bool由byte数组的位寻址而来,bit_address就是数组下标
my_plc.WriteBit(S7_registertype, iDB_num, iDB_start_byteadd, bit_address, (bool)values);
//写非bool
my_plc.Write(S7_registertype, iDB_num, iDB_start_byteadd, values);
//读,count是计数单位,一般写1,以一个byte作为最小计算单位
my_plc.Read(S7_registertype, iDB_num, iDB_start_byteadd, S7_datatyp, count);B. 用静态变量存储PLC的交互数据
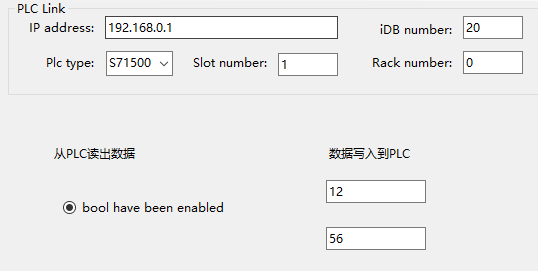
UI和PLC变量如下:


新建static
1
2
3
4
5
6
internal static class data_yamltest_exchange
{
public static byte byte_var;
public static short word_var;
public static bool bool_var;
}数据交互,这里的数据二次封装过的,但是是基于上面S7协议封装的,这里不深究
1
2
3
4
5
6
7
8
9
10
11
12
13
14
15
16
//task1
Task.Run(() =>
{
while (true)
{
if (my_plc_status)
{
//read from plc
data_yamltest_exchange.bool_var = my_s7.bool_rw_value(132, my_plc_iDB, 4, "r", 0); ;
//write to plc
my_s7.write_read_value("word", 132, my_plc_iDB, 2, "w", data_yamltest_exchange.word_var, 0, 1);
my_s7.write_read_value("byte", 132, my_plc_iDB, 0, "w", data_yamltest_exchange.byte_var, 0, 1);
}
}
});UI后端代码,这里用了两个委托来完成radioButton的显示
1
2
3
4
5
6
7
8
9
10
11
12
13
14
15
16
17
18
19
20
21
22
23
24
25
26
27
28
29
30
31
32
33
34
35
36
37
38
39
40
41
42
43
44
45
46
47
48
49
50
51
52
53
54
55
56
public partial class _6Yaml_test : UserControl
{
public _6Yaml_test()
{
InitializeComponent();
this.textBox1.Text = "0";
this.textBox2.Text = "0";
}
string val = null;
bool status = false;
private void _6Yaml_test_Load(object sender, EventArgs e)
{
Task.Run(() =>
{
setTextCallBack sV = new setTextCallBack(setValue);
setRadioCallBack rV = new setRadioCallBack(setStatus);
while (true)
{
if (data_yamltest_exchange.bool_var == true)
{
status = true;
val = "bool have been enabled";
radioButton1.Invoke(sV, val);
radioButton1.Invoke(rV, status);
}
else
{
status = false;
val = "bool have been disabled";
radioButton1.Invoke(sV, val);
radioButton1.Invoke(rV, status);
}
try
{
data_yamltest_exchange.word_var = Convert.ToInt16(textBox2.Text.ToString());
data_yamltest_exchange.byte_var = Convert.ToByte(textBox1.Text.ToString());
}
catch { break; };
}
});
}
//cross-thread delivery
//1.delegate type
public delegate void setTextCallBack(string val);
public delegate void setRadioCallBack(bool status);
//2.delegate function
public void setValue(string val)
{
radioButton1.Text=val;
}
public void setStatus(bool status)
{
radioButton1.Checked = status;
}
}这个方法里,PLC读出的数据存储在自建的静态类里,要写入PLC变量的值也由自建的静态类给出,C#各个线程都可以访问该静态类,避免了各个线程和类之间传值的复杂和繁琐。
C. 用yaml交互
安装
YamlDoNet库
引用命名空间
1
using YamlDotNet.Serialization;新建文件夹,新建
.yaml文件,建立yaml结构
读取yaml文件方法
1
2
3
4
5
6
7
8
9
10
11
//yaml_read
public T Yaml_read<T>(string file_path)
{
var deserializer = new DeserializerBuilder().Build();
T my_yamlObject;
using (var reader = new StreamReader(file_path))
{
my_yamlObject=deserializer.Deserialize<T>(reader);
}
return my_yamlObject;
}写入yaml文件方法
1
2
3
4
5
6
7
//yaml_write
public void Yaml_write(object obj, string file_path)
{
var serializer = new SerializerBuilder().WithNamingConvention(CamelCaseNamingConvention.Instance).Build();
var my_yaml = serializer.Serialize(obj);
File.WriteAllText(file_path, my_yaml);
}建立和yaml结构一致的class结构,这是重点
- 用
[YamlMember(Alias)=""]来指定yaml文件中的结构名] [YamlIgnore]用于在序列化或者反序列化的时候忽略掉它[YamlMember(Order = 1)]用于指定序列化的顺序{get;set;}用于设置yaml结构的属性,公有属性。yaml文件的结构本身就相当于被保护起来的一个私有字段。- yaml文件中不要用table键缩进,会报错,缩进一般使用空格,敲两个或者四个空格
- yaml内容的结构名,和实际程序里面必须一一对应,一字不差
- 用
建立yaml文件需要的程序结构样例
1
2
3
4
5
6
7
8
9
10
11
12
13
14
15
16
17
18
19
20
21
22
23
24
25
26
27
28
29
30
31
32
33
34
//yaml结构
public class yaml_data
{
public class yaml_test_data1
{
[YamlMember(Alias = "Byte_var")]
public byte Byte_var { get; set; }
[YamlMember(Alias = "Word_var")]
public short Word_var { get; set; }
[YamlMember(Alias = "Bool_var")]
public bool Bool_var { get; set; }
}
public class yaml_test_data2
{
[YamlMember(Alias = "Int_var")]
public int Int_var { get; set; }
[YamlMember(Alias = "Char_var")]
public char Char_var { get; set; }
}
// Class II
public class yamal_class_collection
{
[YamlMember(Alias = "test_data1")]
public yaml_test_data1 test_data1 { get; set; }
[YamlMember(Alias = "test_data2")]
public yaml_test_data2 test_data2 { get; set; }
}
//Class I
[YamlMember(Alias="data_collection")]
public yamal_class_collection data_collection { get; set; }
}建立yaml文件内容,注意上下对应
1
2
3
4
5
6
7
8
9
data_collection: #Class I 一级class名称,和程序对应
test_data1: #Class II 二级class名称,和程序对应
Byte_var: 0x10 #各个字段
Word_var: 32
Bool_var: false
test_data2: #Class II 二级class名称,和程序对应
Int_var: 99
Char_var: 'a'示意如图:

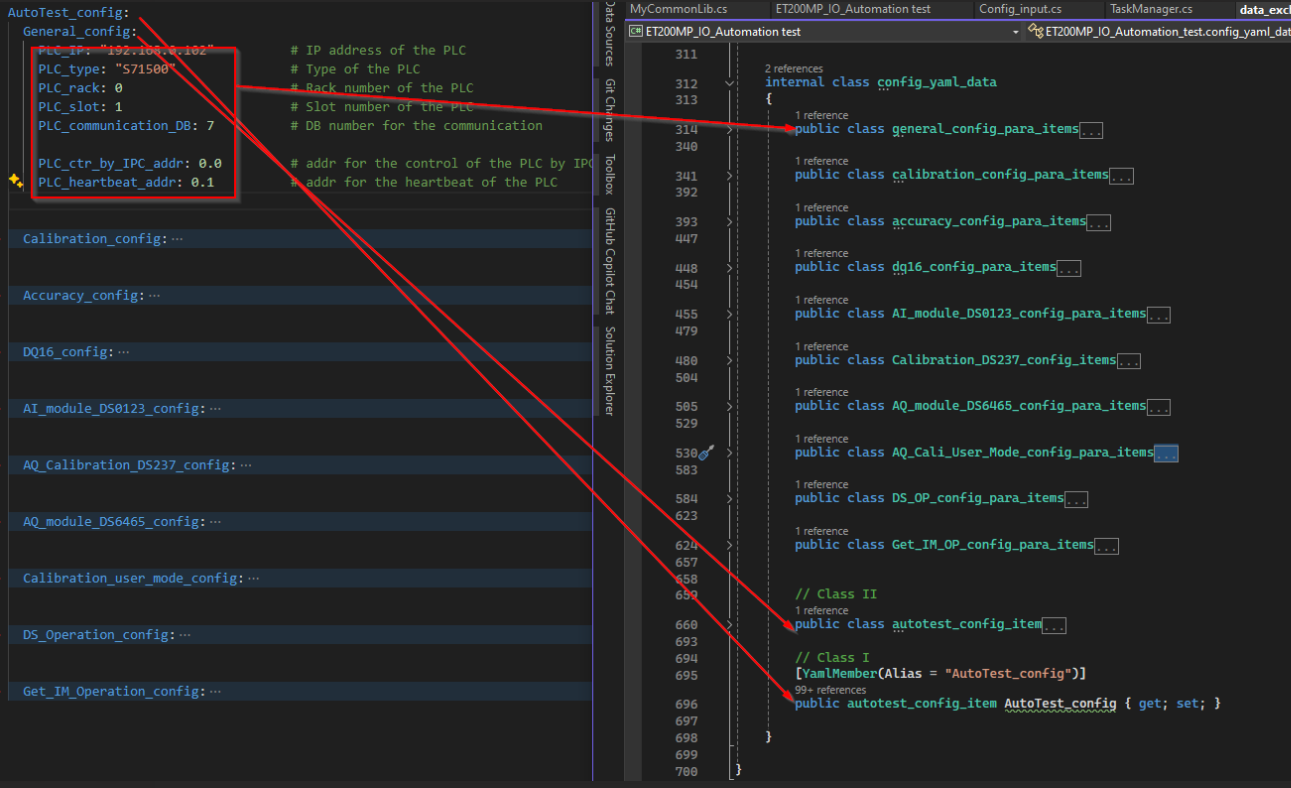
引用yaml,在load事件中读取yaml文件默认配置
1
2
3
yaml_data my_yaml_data = new yaml_data();
Config_yaml my_yaml= new Config_yaml();
my_yaml_data = my_yaml.Yaml_read<yaml_data>("C:\\Users\\testyaml.yaml");
C sharp与PLC变量在数据交互上的一些探索
http://example.com/2024/07/21/C sharp与PLC变量在数据交互上的一些探索/