hexo fluid主题折腾
如何下载fluid主题
- hexo 5.0以上的版本,直接npm安装:
npm install --save hexo-theme-fluid - 安装好之后,在博客目录下创建
_config.fluid.yml,将主题_config.yml的内容复制进去。以后如果修改任何主题配置,都直接修改_config.fluid.yml就好,因为它的配置优先级是高于原_config.yml的。 - 通过
hexo g --debug命令行输出查看覆盖的配置有没有生效 - 全部的fluid主题设置在
node_modules/hexo_theme_fluid/_config.yml里,把自己想要的修改参数拷贝到_config.fluid.yml中。 - 如果主题有更新,使用
npm update --save hexo-theme-fluid执行 - fluid官方参考用户手册
创建about page页
- 使用
hexo new page about添加about页。会生成一个默认的index.md
- index.md的文件实例格式如下,注意
layout: about必须存在,且不能修改成其他值,否则不显示头像等样式1
2
3
4
5
6---
title: 标题
layout: about
---
这里写关于页的正文,支持 Markdown, HTML - about页需要的图片资源:官方手册的建议如果是本地图片,目录文件夹可以自定义,但是必须在source目录下,博客与主题的source目录最终会合并,因此优先选择博客的source,最好图片1MB以内,不然严重拖慢页面加载;指向外站的图片直接放链接。
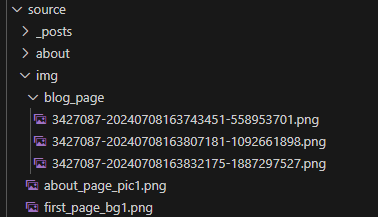
- 存放图片,在source:

- about页里面关于介绍自己的基础信息,需要在
主题配置设置1
2
3
4
5
6
7
8
9
10
11
12
13
14
15
16
17
18#---------------------------
# 关于页
# About Page
#---------------------------
about:
enable: true
banner_img: /img/about_page_pic2.jpg
banner_img_height: 60
banner_mask_alpha: 0.3
avatar: /img/avatar.png
name: "一位不愿透露姓名的小村村同学"
intro: "生活因你而火热"
# 更多图标可从 https://hexo.fluid-dev.com/docs/icon/ 查找,`class` 代表图标的 css class,添加 `qrcode` 后,图标不再是链接而是悬浮二维码
# More icons can be found from https://hexo.fluid-dev.com/docs/en/icon/ `class` is the css class of the icon. If adding `qrcode`, The icon is no longer a link, but a hovering QR code
icons:
- { class: "iconfont icon-github-fill", link: "https://github.com", tip: "GitHub" }
- { class: "iconfont icon-douban-fill", link: "https://douban.com", tip: "豆瓣" }
- { class: "iconfont icon-wechat-fill", qrcode: "/img/favicon.png" }
如何找到fluid的主题设置
- navbar,添加博客标题
1
2
3
4
5
6# 导航栏的相关配置
# Navigation bar
navbar:
# 导航栏左侧的标题,为空则按 hexo config 中 `title` 显示
# The title on the left side of the navigation bar. If empty, it is based on `title` in hexo config
blog_title: 一位不愿透露姓名的小村村同学的个人博客 - banner_img:添加背景图片
1
2
3
4index:
# 首页 Banner 头图,可以是相对路径或绝对路径,以下相同
# Path of Banner image, can be a relative path or an absolute path, the same on other pages
banner_img: /img/first_page_bg1.png - slogan添加标语
1
2
3
4
5
6
7
8# 首页副标题的独立设置
# Independent config of home page subtitle
slogan:
enable: true
# 为空则按 hexo config.subtitle 显示
# If empty, text based on `subtitle` in hexo config
text: "一代人终将老去,但总有人正年轻" - 添加打字机效果
1
2
3
4
5
6
7
8
9
10
11
12
13
14
15
16
17
18
19
20
21
22
23
24# 一些好玩的功能
# Some fun features
fun_features:
# 为 subtitle 添加打字机效果
# Typing animation for subtitle
typing:
enable: true
# 打印速度,数字越大越慢
# Typing speed, the larger the number, the slower
typeSpeed: 70
# 游标字符
# Cursor character
cursorChar: "_"
# 是否循环播放效果
# If true, loop animation
loop: false
# 在指定页面开启,不填则在所有页面开启
# Enable in specified page, all pages by default
# Options: home | post | tag | category | about | links | page | 404
scope: [] - 用不蒜子展示网站的PV,UV数,因为不蒜子不用注册直接使用;把enable使能为true
1
2
3
4
5
6
7
8
9
10
11# 展示网站的 PV、UV 统计数
# Display website PV and UV statistics
statistics:
enable: true
# 统计数据来源,使用 leancloud 需要设置 `web_analytics: leancloud` 中的参数;使用 busuanzi 不需要额外设置,但是有时不稳定,另外本地运行时 busuanzi 显示统计数据很大属于正常现象,部署后会正常
# Data source. If use leancloud, you need to set the parameter in `web_analytics: leancloud`
# Options: busuanzi | leancloud
source: "busuanzi"
pv_format: "总访问量 {} 次"
uv_format: "总访客数 {} 人"
文章页操作
- 文章排序
1
2
3
4
5
6
7---
title: 文章标题
index_img: /img/example.jpg
date: 2019-10-10 10:00:00
sticky: 100
---
以下是文章内容 - 封面图
1
2
3
4
5
6
7---
title: 文章标题
tags: [Hexo, Fluid]
index_img: /img/example.jpg
date: 2019-10-10 10:00:00
---
以下是文章内容 - 统一所有封面图,在主题配置中设置
1
2post:
default_index_img: /img/example.jpg - 文章页大标题下的信息
1
2
3
4
5
6
7
8
9
10
11
12
13
14
15
16
17post:
meta:
author: # 作者,优先根据 front-matter 里 author 字段,其次是 hexo 配置中 author 值
enable: false
date: # 文章日期,优先根据 front-matter 里 date 字段,其次是 md 文件日期
enable: true
format: "dddd, MMMM Do YYYY, h:mm a" # 格式参照 ISO-8601 日期格式化
wordcount: # 字数统计
enable: true
format: "{} 字" # 显示的文本,{}是数字的占位符(必须包含),下同
min2read: # 阅读时间
enable: true
format: "{} 分钟"
views: # 阅读次数
enable: false
source: "leancloud" # 统计数据来源,可选:leancloud | busuanzi 注意不蒜子会间歇抽风
format: "{} 次" - 评论功能推荐Valin,现在
主题配置中把使能打开,再在front-matter中设置。1
2
3
4
5
6
7
8
9
10
11
12
13
14
15
16
17
18
19
20
21
22
23
24
25
26
27
28
29
30
31
32
33
34
35
36
37
38#---------------------------
# 文章页
# Post Page
#---------------------------
post:
banner_img: /img/default.png
banner_img_height: 70
banner_mask_alpha: 0.3
# 评论插件
# Comment plugin
comments:
enable: true
# 指定的插件,需要同时设置对应插件的必要参数
# The specified plugin needs to set the necessary parameters at the same time
# Options: utterances | disqus | gitalk | valine | waline | changyan | livere | remark42 | twikoo | cusdis | giscus | discuss
type: valine
# Valine
# 基于 LeanCloud
# Based on LeanCloud
# See: https://valine.js.org/
valine:
appId:
appKey:
path: window.location.pathname
placeholder:
avatar: 'retro'
meta: ['nick', 'mail', 'link']
requiredFields: []
pageSize: 10
lang: 'zh-CN'
highlight: false
recordIP: false
serverURLs: ''
emojiCDN:
emojiMaps:
enableQQ: false1
2
3
4
5---
title: 标题
layout: about
comment: 'valine'
---
文章分类和标签
- 分类和标签最终都需要在front-master中实现,参考文档,不过再次之前还是先新建一个分类页和一个标签页,以免点不进去。
- 新建分类页
hexo new page categories,标签页hexo new page tags,成功后会生成对应的index.md - 分别在对应的在index.md中添加分类/标签以下内容
1
2
3
4
5---
title: 文章分类
date: 2024-07-21 14:09:44
type: "categories"
---1
2
3
4
5---
title: 文章标签
date: 2024-07-21 14:09:54
type: "tags"
--- - 在博客文章的front-master中,添加相应的内容;
1
2
3
4
5
6
7
8
9---
title: 西门子PLC的大端模式
categories:
- PLC
- 1500PLC
tags:
- PLC part
- industrial control
--- - 上面会生成PLC分类下的子分类1500PLC,以及两个标签。注意:hexo一篇文章只能属于一个分类,也就是说如果在“- web前端”下方添加“-xxx”,hexo不会产生两个分类,而是把分类嵌套(即该文章属于 “- web前端”下的 “-xxx ”分类)。
hexo fluid主题折腾
http://example.com/2024/07/21/hexo fluid主题折腾/